One of the things I love about Stampin’ Up! is the color coordination among the products. There's a main line of colors that is divided into smaller collections – Brights, Neutrals, Regals and Subtles, as well as the In Color collections that are available for two years. The main line of colors is periodically updated to offer on-trend color coordinating products. During this recent color refresh, some core colors retired, some colors returned and some new colors joined the core color line up.
One of my favorite colors returning to the core color line up is Lost Lagoon. It’s in the Subtles collection and is a beautifully soft bluish green or greenish blue. I think it will take the place of Soft Succulent, a recently retired In Color that I used often in my card making projects.
I’ve been tending to go for a similar layout on a lot of my recent card designs (mostly featuring square or rectangular matted layers), so decided to get out of my comfort zone and try something a bit different this time. I went through a bit of experimenting and testing before arriving at my final design.
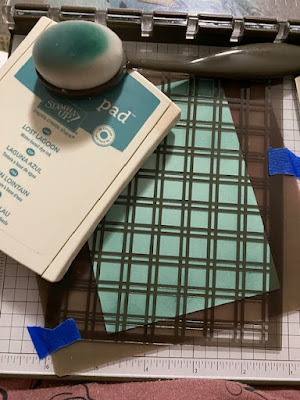
I used one of the Artistic Mix Decorative Masks, a blending brush and Lost Lagoon ink to create a background paper. I think this is the first time I've used the decorative masks, but it won't be the last. So many possibilities!

To step outside my usual straight line design box, I initially cut a strip from the center of the 6” x 6” paper, lining up corner point to opposite corner point along my trimmer and cutting 1” on either side of the point. However, I ended up using one of the leftover triangles instead.
Lost Lagoon Card Base – 5 1/2” x 8 1/2”, scored
and folded at 4 1/4”
Pool Party Layer 1 – 3 ¾” x 5”
Inked Botanicals DSP Layer 2 – One triangle, line up opposite points at 1” mark along trimmer and cut on both sides of center points
Basic White Floral Die Cuts – 3” x 4”
Basic White Sentiment Label – 1” x 3”
Linen Thread – 15”-20” long
- Stamp sentiment on Basic White in Lost Lagoon ink.
- Punch right end of sentiment label with Happy Labels Pick A Punch.
- Stamp floral image from the Dainty Delight stamp set twice on Basic White with Lost Lagoon ink.
- Color floral images with Petal Pink and Pool Party Stampin’ Blends.
- Die cut floral images with coordinating die from the Dainty Delight Dies collection.
- Using Silicone Craft Sheet as a work surface, lay Artistic Mix mask at an angle over Pool Party Layer 1 and tape down with painter’s tape.
- Using a blending brush, brush Lost Lagoon ink over masked Pool Party Layer 1, varying the depth of ink coverage in different areas.
- Line up long edge of DSP triangle Layer 2 along left edge of Pool Party Layer 1 (ends of triangle piece will extend past ends of Layer 1.
- When happy with placement, apply adhesive to back of DSP Layer 2 and adhere to Pool Party Layer 1.
- Trim DSP Layer 2 triangle ends even with top and bottom of Pool Party Layer 1.
- Apply adhesive to back of Pool Party Layer 1 and adhere to card front.
- Adhere sentiment label to card front approximately 1 ½” from bottom and left side of card front.
- Arrange the two floral die cuts so that they offset each other a little, adhere one to the other with a few glue dots.
- Loop Linen thread around fingers/hand so that there are several loops about 3.5-4” long.
- Add adhesive to center back of the floral images and adhere looped linen thread to the back of these die cuts.
- Place Mini Stampin’ Dimensionals along back of these die cuts and adhere to card front over left edge of sentiment label.
- Place Tinsel Gem embellishments on sentiment label/card front as desired.
Thanks for stopping by today! Don’t forget to check out my teammates’ blogs by clicking on the links below. We always appreciate your feedback - let us know you stopped by and leave a comment!


Beautiful card! Love Lost Lagoon!
ReplyDeleteLove the card and the color last lagoon
ReplyDeleteI love your card layout and the angle of your blender brushed decorative mask piece. Great Job!
ReplyDelete