Thursday, July 27, 2023

Horse & Sleigh Fun Fold

Welcome to the July 2023 Creative Card-iology Team Blog Hop! We’re glad you've joined us to check out this month’s cardmaking inspiration featuring Stampin’ Up’s Online Exclusives. 


I chose the One Horse Open Sleigh Suite Collection and a simple Z Fold for my project this month.  The Designer Series Paper in this suite has some really beautiful scenic 6x6 paper designs!  And the Horse and Sleigh stamp set and dies have a nostalgic winter theme that brings back fond memories of holidays with my grandparents as the call to mind the old holiday song “Over the River and Through the Woods.”


Here are the cutting measurements:

     Misty Moonlight Card Base – 4 ¼” x 11”, scored at 2 ¾” and 5 ½”

     Basic White – 2 pieces 2 ½” x 4”, 1 piece 2 ½” x 5 ½” and 1 piece ¾” x 3”

     One Horse Open Sleigh DSP – 2 pieces from same pattern 2 ½” x 4”

     Basic Black – 1 piece 2 ½” x 5 ½”

     Black Bakers Twine – approximately 15” long

Directions:

1.  Fold Misty Moonlight Card Base at 5 ½” score mark.

2.  Fold card base back in opposite direction along 2 ¾” score mark.

3.  Stamp sentiment in Misty Moonlight ink on ¾” x 3 ¼” Basic White piece.

4.  Punch ends of sentiment label with Happy Labels Pick A Punch.

5.  Stamp horse and sleigh image in Memento ink on the 2 ½” x 5 ½” Basic White piece and color with Stampin’ Blends (I used Real Red, Basic Black, Smoky Slate, Boho Blue, Misty Moonlight, Pool Party, Crumb Cake, and Ivory Blends).

6.  Die cut colored horse and sleigh image.

7.  Die cut a second horse and sleigh from the Basic Black piece.

8.  Adhere colored horse and sleigh die cut to Basic Black horse and sleigh die cut, offsetting it just a bit to give a shadow effect.

9.  Adhere 1 piece of DSP on far left panel and the other on the far right side of the card front.

10. Adhere the 2 remaining Basic White pieces (2 ½” x 4”) to the center 2 sections of the card base.

11. Place glue dots on back of sleigh and the tip of the horse’s tail and adhere to left and bottom of DSP card front panel (making sure that die cut is only adhered to this left panel).

12. Place small amount of adhesive on back of sentiment label and adhere looped Black Bakers Twine to back of sentiment label.

13. Place Stampin’ Dimensionals on back of sentiment label so that left and center of sentiment label are adhered to DSP panel but right end of sentiment label swings free when card is opened.

14. Place snowflake embellishments on sentiment label/card front as desired.

15. In center of each snowflake embellishment, place an Iridescent Rhinestone Basic Jewel.

I hope you enjoyed this project!  Don’t forget to check out my teammates’ blogs by clicking on the links below!  We appreciate your feedback, so feel free to leave a comment!

Bonnie's Blog

Diana's Blog

Jessica's Blog

Thanks for hopping with us today!  I hope you'll check out all of the online exclusive products at my webstore.  There's still time to earn bonus coupons this month - for every $50 ordered, you'll earn a $5 bonus coupon that you can use toward a purchase in August.

Our team always has a great time stamping and inspiring each other, and we'd love to have you join us!  I'd love to answer any questions you might have!  

Product List
One Horse Open Sleigh Suite Collection (English)
$72.50
Basic Black 8-1/2" X 11" Cardstock
$10.00
Basic White 8 1/2" X 11" Cardstock
$10.50
Misty Moonlight 8-1/2" X 11" Cardstock
$10.00
Misty Moonlight Classic Stampin' Pad
$9.00
Tuxedo Black Memento Ink Pad
$6.50
Basic Black Stampin' Blends Combo Pack
$10.00
Boho Blue Stampin’ Blends Combo Pack
$10.00
Bronze & Ivory Stampin' Blends Combo Pack
$10.00
Crumb Cake Stampin' Blends Combo Pack
$10.00
Misty Moonlight Stampin' Blends Combo Pack
$10.00
Pool Party Stampin' Blends Combo Pack
$10.00
Real Red Stampin' Blends Combo Pack
$10.00
Smoky Slate Stampin' Blends Combo Pack
$10.00
Baker's Twine Essentials Pack
$11.00
Iridescent Rhinestones Basic Jewels
$7.50
Happy Labels Pick A Punch
$27.00
Mini Stampin' Cut & Emboss Machine
$66.00
Mini Glue Dots
$5.75
Stampin' Dimensionals
$4.25
Stampin' Seal+
$12.00

Thursday, June 22, 2023

Fresh As a Daisy Art Journal Cover


Welcome to the Creative Card-iology Team June 2023 Blog Hop! We’re celebrating Designer Series Paper (DSP) in this month's hop!  There is a 15% off sale on select Stampin' Up! DSP collections through June 30th, and I hope you'll get some creative inspiration from our projects this month.


I've had a project in mind that I wanted to experiment with for a while now, and this month's theme seemed the perfect opportunity to do so!  I've been wanting to make a mixed media art journal for a while now, and the beautiful paper collections offered great selections for my journal cover.  The only problem was which one to choose!


I finally decided on the Fresh As A Daisy collection, and the Crafting With You bundle was just the right set for embellishing my cover.  I'm not going to give step-by-step directions for this project as I'm experimenting along the way, but I will take you through some of my process for the cover.  The design on my journal cover would definitely make a great card as well as the journal cover and it really lets the gorgeous paper shine! 

I'm planning on using recycled/unused bill payment envelopes to create base pages for inside my journal, so I measured the envelope size.  I wanted to have the cover be larger than my envelopes so I added 1" to the size of the envelope to get my measurements for my front and back piece.  I used cardboard from a package of foil paper and cut a front piece, back piece and a spine, and then adhered my pieces to my DSP.  That process is a bit more complicated to explain than what I can go into here, so I'll just concentrate on the front embellishments.

I die cut my easel from Copper Clay cardstock, a stitched circle on Basic White using a die from the Stylish Shapes die collection, stamped the and brushes on Basic White with Copper Clay Ink.  I die cut the brushes and fussy cut around the sentiment, separating the sentiment so that it fit on the circle.  My "art journal" sentiment was typed and printed off with my computer/printer and ends punched with the Banners Pick A Punch.  I cut a second piece of the same DSP pattern, sized to fit on the easel over the same spot on the underlying paper on the cover.  I sponged around the circle, the easel and the "painting" with Copper Clay ink.  I also added a touch of blue to the ends of a couple of the brushes with Blends.  Everything was adhered with glue dots and Dimensionals.  I added a few Copper Clay Adhesive-Backed Solid Gems to the front and a couple on the spine.  

I hope to show you more of my journal in future posts or videos, and I hope it sparks your imagination on how you might be able to use the beautiful paper collections for cards and other projects!

Thanks for stopping by today!  Don’t forget to check out my teammates’ blogs by clicking on the links below.  We always appreciate your feedback - let us know you stopped by and leave a comment!

Bonnie's Blog

Diana's Blog

Jessica's Blog

Don't forget to check out the Designer Series Paper Sale and more at my website here.  The best deal you can get on Stampin' Up! projects is the Starter Kit, where this month you can choose $155 (USD) in product for only $99 (USD) plus tax.  That's $30 in product more than normal, through the end of June!  I hope you'll consider  joining our team - we always learn so much from each other and have a great time stamping together!  I'd love to help you get answers to any questions you might have regarding this opportunity, so please reach out and let me know how I can best assist you in your creative journey!


Product List
Fresh As A Daisy 12" X 12" (30.5 X 30.5 Cm) Designer Series Paper
$12.50
Crafting With You Bundle (English)
$54.00
Stylish Shapes Dies
$30.00
Banners Pick A Punch
$27.00
Copper Clay 8 1/2" X 11" Cardstock
$10.00
Basic White 8 1/2" X 11" Cardstock
$10.50
Copper Clay Classic Stampin' Pad
$9.00
Boho Blue Stampin’ Blends Combo Pack
$10.00
Adhesive Backed Solid Gems
$8.00
Paper Snips
$11.00
Paper Trimmer
$26.00
Mini Stampin' Cut & Emboss Machine
$66.00
Mini Glue Dots
$5.75
Stampin' Dimensionals
$4.25
Tear & Tape Adhesive
$7.00

Thursday, May 25, 2023

Favorite Returning Colors


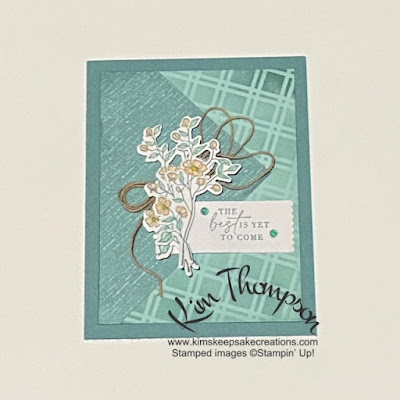
Welcome to the May 2023 Creative Card-iology Team Blog Hop! We’re glad you've joined us to check out this month’s cardmaking inspiration featuring some of our favorite returning colors in Stampin’ Up!’s 2023 Color Refresh. 

One of the things I love about Stampin’ Up! is the color coordination among the products.  There's a main line of colors that is divided into smaller collections – Brights, Neutrals, Regals and Subtles, as well as the In Color collections that are available for two years.  The main line of colors is periodically updated to offer on-trend color coordinating products.  During this recent color refresh, some core colors retired, some colors returned and some new colors joined the core color line up.

One of my favorite colors returning to the core color line up is Lost Lagoon.  It’s in the Subtles collection and is a beautifully soft bluish green or greenish blue.  I think it will take the place of Soft Succulent, a recently retired In Color that I used often in my card making projects. 


I’ve been tending to go for a similar layout on a lot of my recent card designs (mostly featuring square or rectangular matted layers), so decided to get out of my comfort zone and try something a bit different this time.  I went through a bit of experimenting and testing before arriving at my final design.

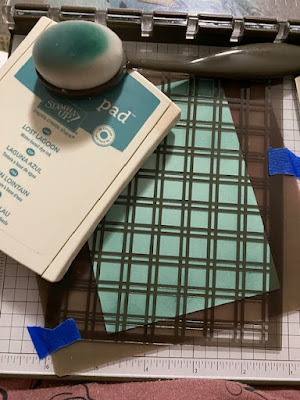
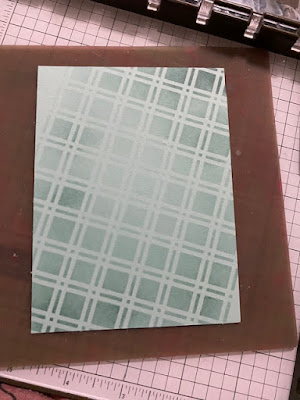
I used one of the Artistic Mix Decorative Masks, a blending brush and Lost Lagoon ink to create a background paper.  I think this is the first time I've used the decorative masks, but it won't be the last.  So many possibilities!   


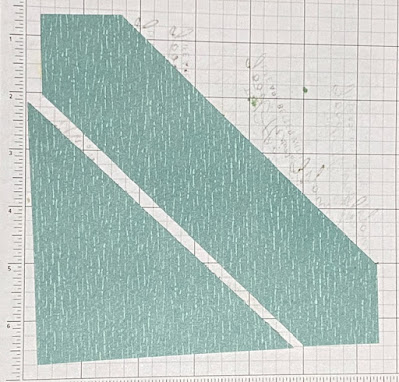
To step outside my usual straight line design box, I initially cut a strip from the center of the 6” x 6” paper, lining up corner point to opposite corner point along my trimmer and cutting 1” on either side of the point.  However, I ended up using one of the leftover triangles instead.


Here are the cutting measurements and steps I followed to make this card:

Lost Lagoon Card Base – 5 1/2” x 8 1/2”, scored and folded at 4 1/4”

Pool Party Layer 1 – 3 ¾” x 5”

Inked Botanicals DSP Layer 2 – One triangle, line up opposite points at 1” mark along trimmer and cut on both sides of center points

Basic White Floral Die Cuts – 3” x 4”

Basic White Sentiment Label – 1” x 3”

Linen Thread – 15”-20” long

  - Stamp sentiment on Basic White in Lost Lagoon ink.

  - Punch right end of sentiment label with Happy Labels Pick A Punch.

  - Stamp floral image from the Dainty Delight stamp set twice on Basic White with Lost Lagoon ink.

  - Color floral images with Petal Pink and Pool Party Stampin’ Blends.

  - Die cut floral images with coordinating die from the Dainty Delight Dies collection.

  - Using Silicone Craft Sheet as a work surface, lay Artistic Mix mask at an angle over Pool Party Layer 1 and tape down with painter’s tape.

  - Using a blending brush, brush Lost Lagoon ink over masked Pool Party Layer 1, varying the depth of ink coverage in different areas.


  - Line up long edge of DSP triangle Layer 2 along left edge of Pool Party Layer 1 (ends of triangle piece will extend past ends of Layer 1.

 - When happy with placement, apply adhesive to back of DSP Layer 2 and adhere to Pool Party Layer 1. 

  - Trim DSP Layer 2 triangle ends even with top and bottom of Pool Party Layer 1.

  - Apply adhesive to back of Pool Party Layer 1 and adhere to card front.

  - Adhere sentiment label to card front approximately 1 ½” from bottom and left side of card front.

  - Arrange the two floral die cuts so that they offset each other a little, adhere one to the other with a few glue dots.

  - Loop Linen thread around fingers/hand so that there are several loops about 3.5-4” long.

  - Add adhesive to center back of the floral images and adhere looped linen thread to the back of these die cuts.

  - Place Mini Stampin’ Dimensionals along back of these die cuts and adhere to card front over left edge of sentiment label.

  - Place Tinsel Gem embellishments on sentiment label/card front as desired.

Thanks for stopping by today!  Don’t forget to check out my teammates’ blogs by clicking on the links below.  We always appreciate your feedback - let us know you stopped by and leave a comment!

Bonnie's Blog

Diana's Blog

Jessica's Blog 

I'm always inspired by the projects my teammates create, and I hope you are too!  We'd love to have  you join us on our stamping adventures by joining our team.  You can choose $125 in product for only $99 plus tax - and shipping on your starter kit is free!  And a Paper Pumpkin Kit will be included as well.  Visit my webstore here to join today!  I'd be glad to answer any questions you have as honestly as I can or help you through the process - just let me know how I can help!

All of the products used in my project above are in the Stampin' Up! 2023-2024 Annual Catalog and are linked below.  You can find these and many more great products on my webstore here.


Product List
Dainty Delight Cling Stamp Set (English)
$25.00
Dainty Delight Dies
$36.00
Basic White 8 1/2" X 11" Cardstock
$10.50
Inked Botanicals 6" X 6" (15.2 X 15.2 Cm) Designer Series Paper
$12.50
Lost Lagoon 8-1/2" X 11" Cardstock
$10.00
Pool Party 8-1/2" X 11" Cardstock
$10.00
Lost Lagoon Classic Stampin' Pad
$9.00
Daffodil Delight Stampin' Blends Combo Pack
$10.00
Petal Pink Stampin' Blends Combo Pack
$10.00
Pool Party Stampin' Blends Combo Pack
$10.00
Linen Thread
$5.00
Tinsel Gems Four Pack
$8.00
Artistic Mix Decorative Masks
$10.00
Blending Brushes
$13.00
Happy Labels Pick A Punch
$27.00
Mini Stampin' Cut & Emboss Machine
$66.00
Paper Snips
$11.00
Paper Trimmer
$26.00
Take Your Pick
$11.00
Mini Glue Dots
$5.75
Mini Stampin' Dimensionals
$4.25
Multipurpose Liquid Glue
$5.50
Stampin' Seal
$8.00
Simply Shammy
$8.50