Thursday, March 24, 2022

Savings Are in Bloom with Garden Wishes


This month’s Creative Card-iology Team Blog Hop highlights bundles from the Savings are in Bloom sale that runs through the end of March.  This special promotion features the Mini Stampin’ Cut & Emboss Machine and 13 stamp and die bundles, all of which can be purchased at 20% off the full retail price during this sale.

I love my Mini Stampin’ Cut & Emboss machine – it’s so easy to use and very portable!  When I’m needing to take a project on the go, I just pack my machine along with my stamp set, dies or embossing folders, ink, precut paper, and other supplies in my Stampin’ Up! lunch bag – and I’m ready to go!  

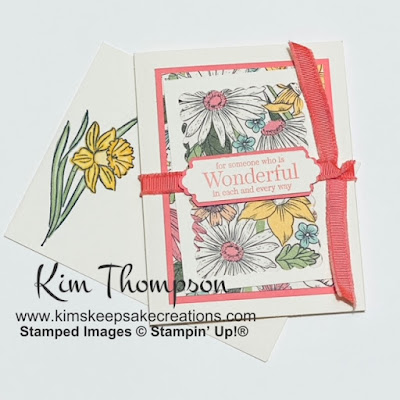
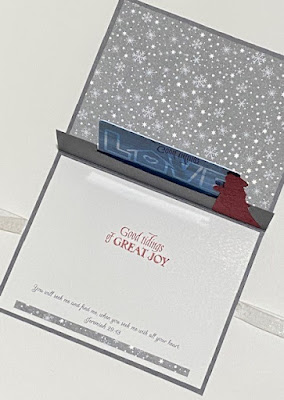
While I do enjoy reading books on my electronic devices, I still love holding a book in my hands and turning the pages as I read.  I often have several books in process, so I’m always in need of a bookmark to hold my spot!  My project today, using the Garden Wishes bundle, is a bookmark that fits over the top of a page.  This over-the-page design helps the bookmark to stay in place. 

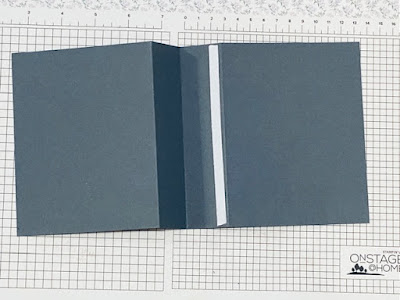
Here are the directions to make this bookmark:

 - Cut the following pieces:  

      Bookmark Base: Cut a piece of Just Jade cardstock (one of the soon-to-be retired 2020-2022 In Colors) to measure 2” x 11”, score and fold it in half.

      Layer 1:  Cut a piece of Just Jade cardstock measuring 13/4 x 47/8”.

      Sentiment and Die Cuts:  Cut 2 pieces of Basic White cardstock measuring 21/2 x 4”.

      Ribbon: 8-10” of the Just Jade Gingham Ribbon from the Flowers for Every Season Ribbon Combo Pack.

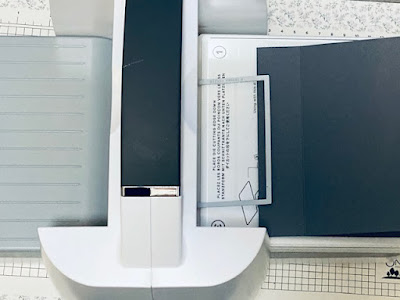
 - Slide folded bookmark base almost all of the way in to the tag topper punch, but leave enough room so that the top scallop does not punch the fold.

 - Place Layer 1 in the selected Greenery Embossing Folder and run it through the Mini Stampin’ Cut & Emboss Machine.

 - Stamp floral image on one of the pieces of Basic White cardstock in Just Jade ink.

 - Stamp sentiment and bee image on the second piece of Basic White cardstock in Just Jade ink.

 - Die cut the floral and bee images with the coordinating dies using the Mini Stampin’ Cut & Emboss Machine.

 - Cut the stamped sentiment apart as shown.

 - Adhere the embossed layer to the front of the bookmark base with Multipurpose Liquid Glue.

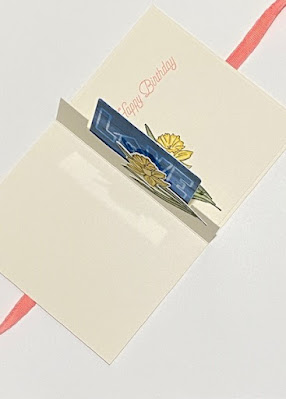
 - Adhere the cut sentiment pieces to the top and bottom of the embossed layer and then adhere the die cut floral image with Multipurpose Liquid Glue.

 - Adhere the die cut bee with a few stacked glue dots.

 - Slide the ribbon through the slot at the top of the bookmark and knot the ribbon so that the knot is toward the front of the bookmark.  Then finish it off by tying a bow and trim edges of ribbon as needed.


All of the bundles in the Savings are in Bloom promotion work well with the Mini Stampin' Cut & Emboss machine, and you can 
check out all the details here.

Don’t forget to visit my teammates’ blogs by clicking on the links below!  

Bonnie's Blog

Diana's Blog

Jessica's Blog


Thanks for hopping along with us today!  

Product List

Garden Wishes Bundle (English)
$51.25
Basic White 8 1/2" X 11" Cardstock
$9.75
Just Jade 8-1/2" X 11" Cardstock
$8.75
Just Jade Classic Stampin' Pad
$7.50
Flowers For Every Season Ribbon Combo Pack
$10.00
Fancy Tag Topper Punch
$23.00
Greenery Embossing Folders
$8.00
Mini Stampin' Cut & Emboss Machine
$60.00
Multipurpose Liquid Glue
$4.00
Mini Glue Dots
$5.25
Paper Snips
$10.00
Paper Trimmer
$25.00
Clear Block A
$4.00
Clear Block H
$8.50
Simply Shammy
$8.00

Thursday, February 24, 2022

Calming Camellia and Embracing Imperfection


Thanks for hopping with us today as we feature some of our favorite Sale-A-Bration items for this month’s Creative Card-iology Team Blog Hop.  Can you believe Sale-A-Bration is almost over?  There are only a few more days left to take advantage of all the freebies that come with ordering during Sale-A-Bration! 


I chose the Calming Camellia stamp set to feature today as I love the sentiments, the fonts and the images in this set.  Calming Camellia is one of the Distinktive stamp sets that can create different opacities in just one stamped image.  With other stamps you’d need 2- or 3-step stamping to achieve a similar depth in the image. 

I’m pretty new to using the Distinktive stamps, so I can’t tell you a lot of secrets to getting the best results.  If you’ve used them and learned some great tips, I would love to hear from you!

I decided to make a slimline card and try out the new Slim Card Dies and Slimline Envelopes along with the Calming Camellia stamps. When I saw the scalloped edge in the die collection, I knew I wanted to use that along the front of my card base and leave a border of Designer Series Paper showing when the card front is closed.   Soft Succulent cardstock and envelope and the Symbols of Fortune Specialty Designer Paper were perfect choices for my card. 

My card base measured 8.5” x 7”, scored and folded to measure 8.5” x 3.5”.  I first die cut the scalloped edge on the front of my card base, and then also die cut a piece of white cardstock and patterned paper together so that they would fit tightly on the inside of my card.  

I tested out my Distinktive stamp on a scrap piece of paper first, and then decided to try embossing it to see how the image turned out.  I used clear embossing powder with Soft Succulent ink.  When I use the colored ink pads instead of VersaMark ink for embossing, I try to make sure my ink pad is not too dry and have my embossing powder ready to apply as these inks dry more quickly than the VersaMark ink. 

I was fairly happy with my image, so went on to stamp my flourishes, my inside sentiment and add embellishments.

I wish I could say this card went together just like I imagined it, but it didn’t.  And that’s okay!   When I stamped my flourish at the bottom of my card front, I had ink along the edge of my stamp that left an extra rim of ink.  I was able to use the 2021-2023 In Color Jewel embellishments to cover that extra ink spot, and I really like the elegance the gems add to the card front.  I also didn’t adhere the card inside where I should have so the white cardstock showed when I closed my card.  But I took the brush end of the Soft Succulent Stampin’ Write Marker and colored along the scalloped edge where the white cardstock and patterned paper met.  I also used a sponge dauber and sponged Soft Succulent ink along the scalloped edge of my card front so that the edges blend together when closed. 

There were times in the process of creating this card that I wanted to stop and start over, and I could have.  And you'll find that too.  But sometimes you just have to embrace the imperfections and keep on going!

Calming Camellia is a host set available for free when you have an order or workshop that totals $300 or more.  That can seem like an impossible goal to hit especially with the end of the month approaching quickly, but it can be done and I would love to help you do it!  One way to do it would be to invite some friends to do a kit class with you, either with any of the kits in the collection or with the Paper Pumpkin Kit.  March is Paper Pumpkin’s anniversary month, and the upcoming kit is one you will love to share with friends.  We can just set up an event, have you and your guests purchase a prepaid Paper Pumpkin subscription for 1 or more months and close your event before the end of February, and then gather together virtually or in person later in March to put them together when the kits arrive!  Contact me at kimskeepsakecreations@gmail.com or comment below to get the party going!

Thanks for stopping by my blog today!  Don’t forget to check out my friends’ projects by following the links below.  We love hearing your thoughts on our projects, so leave a comment and let us know you stopped by!

Diana's Blog

Jessica's Blog


Product List
Calming Camellia Host Cling Stamp Set (English)
$24.00
Soft Succulent 8 1/2" X 11" Cardstock
$8.75
Basic White 8 1/2" X 11" Cardstock
$9.75
Symbols Of Fortune 12" X 12" (30.5 X 30.5 Cm) Specialty Designer Series Paper
$15.00
Soft Succulent Classic Stampin' Pad
$7.50
Slim Card Dies
$59.00
Slimline Envelopes
$10.00
Basics Embossing Powders
$18.00
Heat Tool (Us And Canada)
$30.00
2021–2023 In Color Stampin' Write Markers
$15.00
2021–2023 In Color Jewels
$7.00
Sponge Daubers
$5.00
Simply Shammy
$8.00
Multipurpose Liquid Glue
$4.00
Take Your Pick
$10.00
Clear Block D
$8.50

Thursday, January 27, 2022

Sale-A-Brating with Hello Friend


Welcome to the first Creative Card-iology Blog Hop of 2022 - we are so glad you've joined us!  You can hop along with us by clicking on the links to my teammates’ blogs toward the bottom of this post.  We always appreciate your feedback, so please let us know you've stopped by and leave a comment.

Our theme this month is Sale-A-Bration favorites.  I love Sale-A-Bration so much – I mean who doesn’t love FREE stamping products!  For this month’s project I’ve chosen to use the Friendly Hello stamp set and Designer Series Paper (DSP), which together are a Free with $100 Sale-A-Bration item.  These products, with the beautiful colors, flowers and birds, offered me a taste of spring in the midst of chilly winter weather.


My friend Stevie has a birthday this week, and this set was a perfect choice to make a card for her.  I chose Fresh Freesia as my card base color with accents of Shaded Spruce.  I cut a piece of my DSP pattern measuring about 3” by 4 ¼”, added a piece of Fresh Freesia ribbon and a faux bow with another piece of ribbon, and then adhered it to 3 1/8” by 4 3/8” piece of Shaded Spruce cardstock.  I stamped a smaller floral/leaf image in Fresh Freesia ink around the edge of my card base, and then adhered my matted DSP to the card base.


I then stamped the larger double floral stamp that coordinated with an image on my DSP onto a piece of white cardstock in Fresh Freesia ink and colored it with the Fresh Freesia Stampin’ Blends combo.  I fussy cut this stamped and colored image and adhered it over the image on the DSP with Stampin’ Dimensionals.

My next step was to stamp my sentiment in Shaded Spruce ink on a strip of white cardstock.  I trimmed my sentiment piece so that there was about an 1/8” border above and below my sentiment.  I punched each end of this strip with my Everyday Label punch (see photo below), and then stamped the small floral image in the bottom left corner of this strip.  Using a blending brush, I brushed the edge of this sentiment label with Shaded Spruce ink.  I then adhered this to the lower right corner of my card base, and then added Fresh Freesia In Color gems to the center of floral images on the sentiment label and the cut flowers piece.


I stamped a birthday greeting and floral accents on a 4” x 5 ¼” piece of white cardstock for the inside of my card, and then stamped the floral image on my envelope as well.  And my card for Stevie was complete.  So easy and fun!


I hope you enjoyed this project!  The new January to June 2022 mini catalog and Sale-A-Bration brochureare available now with gorgeous spring stamp sets, tools and papers, and you can view these new products and more when you visit my online store.  The specific products used for today’s blog project can be seen below. 

Sale-A-Bration brings with it great hosting benefits and also a great join special - $125 in product for just $99 plus your choice of any 2 stamps sets for FREE!  If you’d like to hear more about these opportunities to share your love of stamping, visit my online store and click on the "Host" or "Join" tabs, comment below or reach out to me through email at kimskeepsakecreations@gmail.com. 

Thanks again for blog hopping with us today.  Don’t forget to check out my teammates’ blogs by clicking on the links below!


Product List
Friendly Hello Bundle (English)
$0.00
Basic White 8 1/2" X 11" Cardstock
$9.75
Fresh Freesia 8 1/2" X 11" Cardstock
$8.75
Shaded Spruce 8-1/2" X 11" Cardstock
$8.75
Fresh Freesia Classic Stampin' Pad
$7.50
Shaded Spruce Classic Stampin' Pad
$7.50
Fresh Freesia Stampin' Blends Combo Pack
$9.00
2021–2023 In Color Jewels
$7.00
Fresh Freesia 3/8" (1 Cm) Open Weave Ribbon
$7.00
Blending Brushes
$12.00
Everyday Label Punch
$18.00
Paper Snips
$10.00
Paper Trimmer
$25.00
Stampin' Dimensionals
$4.00
Stampin' Seal
$8.00

Thursday, December 23, 2021

Wise Men and Daffodils


Greetings of the Season from the Creative Card-iology Team bloggers!  Thank you for celebrating with us this month as we share our love for stamping and the Stampin’ Up! products with you!

You can hop along with us by clicking on the links to my teammates’ blogs toward the bottom of this post.  We always appreciate your thoughts, so please leave a comment and let us know you've stopped by. 

You might wonder from the title of my post what wise men and daffodils have in common, and here it has to do with our blog hop theme this month - gift card or treat packaging.  This theme came at a perfect time for me as my sister had asked me to make cards where she would be able to include a gift card or gift certificate.  With just a simple cut and a few scores, you can create a card for any occasion that includes a pop-up gift card holder, and in this post you’ll see one made with retiring products and one made with products from the new January-June 2022 Mini Catolog – Wise Men and Daffodils.


Some of the products you’ll see today have already been retired, and some won’t be available to order for a couple weeks yet (unless you join the Stampin’ Up! team of demonstrators and take advantage of the demonstrator pre-ordering benefit), but the great thing about this project is that you can use any stamp set or paper!

I turned to Pinterest as I often do to search for ideas.  I knew what I had in mind, I was just looking to see if someone had already figured out measurements and how-tos.  I found a post by Jeanie Stark of juststampin.com (thank you Jeanie!) that had just what I was looking for.

The pop up gift card holder starts with a card base measuring 5 ½” x 11”,  scored at 4 ¼”, 5 ½” and 6 ¾”.  I folded along the 5 ½” score line first, and then folded the opposite way along the other 2 score lines.  I placed Tear ‘n Tape along the top edge of one of the folded score lines and sealed the folded piece together.  I then used the fourth smallest Stitched Rectangle Die to die cut an opening to hold a gift card or cash.  I ran my die and card through the Stampin’ Cut & Emboss Machine several times to make sure my die cut all the way through the layers.  I trimmed any excess paper left with my Paper Snips.


I used the Great Tidings bundle and paired it with the Peaceful Place Specialty Designer Series Paper for my sister’s cards.  I cut a piece of the Peaceful Place DSP and matted it onto a layer of Basic Black cardstock.  I die cut three wise men from Blackberry Bliss, Night of Navy and Cherry Cobbler and embossed them with the Timeworn Type embossing folder.  I also die cut a star from silver foil paper and placed a Basic Rhinestone Gem in the center of this start and a couple gems on the Peaceful Place DSP layer.  My “Wise men still seek Him” sentiment was stamped on a piece of Basic White and punched with the Lovely Labels Pick-A-Punch and then layered onto a punched Basic Black label. 

On the inside of my card, I added a Basic White layer for my inside sentiment.  I also adhered an embossed wise man die cut to the pop up and a piece of DSP for a background.


A 20” piece of White Glittered Organdy ribbon was adhered to the back of my card.  This ties in the front to hold the card closed.   

I made a second version of this card using the new Daffodil Daydream bundle and the Daffodil Afternoon DSP (a free with $50 Sale-A-Bration item) to make a Birthday pop up gift card holder.  I die cut a frame using the Scalloped contours
dies to frame the beautiful new Daffodil Afternoon DSP (really love this free DSP!) and colored Petal Pink Frayed Grosgrain ribbon with Flirty Flamingo Stampin' Blends to match my choice of cardstock and ink for this version.  I also used Daffodil Delight, Mossy Meadow and Old Olive Stampin' Blends to color my daffodils on the inside of the card and the coordinating envelope. 


Hope is also something wise men and daffodils have in common.  At Christmas we celebrate the joy the wise men felt when they saw the star (Matthew 2:10) that led them to find Jesus, the fulfillment of God’s promise of a Savior.  Daffodils symbolize hope and new birth and growth with the coming of Spring, which is the season where we celebrate the Savior’s resurrection from the dead that gives us “new birth into a living hope” (1 Peter 1:3).

Hope is the theme of the January Encountering Joy box collection!  These boxes make a great gift for a friend or yourself as a tool for focus and reflection.   Each box includes a mini journal/album, 5 note cards and envelopes to send out, and cards with scripture to reflect on the theme of Hope.  If you’d like more information on this monthly box kit, click here.    

If you'd like to check out the products used for my project, you can click on the links below or stop by my online shop.  The December 2021 host code is YNTJPFJ2.

I'd love to connect with you through my newsletter and share inspiration, updates on what's happening with Stampin' Up! and information on any scheduled classes.  Just click here to fill out the form to opt in to my newsletter and receive a free tutorial as well!

Merry Christmas to you all and thanks for hopping along with us today!  Don't forget to let me know you were here by leaving a comment and check out my teammates' blogs by clicking on the links below.


Product List