

Greetings
of the Season from the Creative Card-iology Team bloggers! Thank you for celebrating with us this month
as we share our love for stamping and the Stampin’ Up! products with you!
You can
hop along with us by clicking on the links to my teammates’ blogs toward the
bottom of this post. We always appreciate your thoughts, so please leave
a comment and let us know you've stopped by.
You might
wonder from the title of my post what wise men and daffodils have in common,
and here it has to do with our blog hop theme this month - gift card or treat
packaging. This theme came at a perfect
time for me as my sister had asked me to make cards where she would be able to
include a gift card or gift certificate. With just a simple cut and a few scores, you
can create a card for any occasion that includes a pop-up gift card holder, and
in this post you’ll see one made with retiring products and one made with
products from the new January-June 2022 Mini Catolog – Wise Men and Daffodils.
Some of the products you’ll see today have already been retired, and some won’t be available to order for a couple weeks yet (unless you join the Stampin’ Up! team of demonstrators and take advantage of the demonstrator pre-ordering benefit), but the great thing about this project is that you can use any stamp set or paper!
I turned
to Pinterest as I often do to search for ideas.
I knew what I had in mind, I was just looking to see if someone had
already figured out measurements and how-tos.
I found a post by Jeanie Stark of juststampin.com (thank you Jeanie!)
that had just what I was looking for.
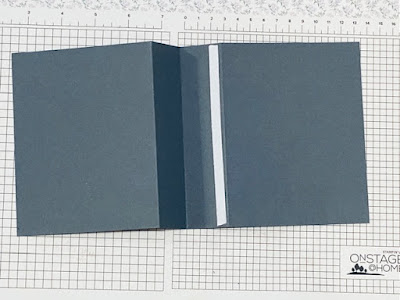
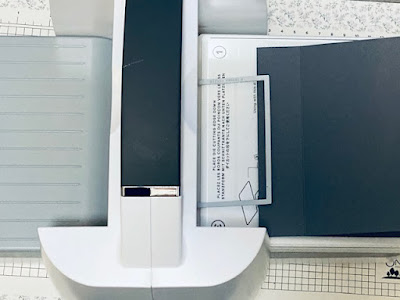
The pop
up gift card holder starts with a card base measuring 5 ½” x 11”, scored at 4 ¼”, 5 ½” and 6 ¾”. I folded along the 5 ½” score line first, and
then folded the opposite way along the other 2 score lines. I placed Tear ‘n Tape along the top edge of one
of the folded score lines and sealed the folded piece together. I then used the fourth smallest Stitched Rectangle
Die to die cut an opening to hold a gift card or cash. I ran my die and card through the Stampin’
Cut & Emboss Machine several times to make sure my die cut all the way
through the layers. I trimmed any excess
paper left with my Paper Snips.
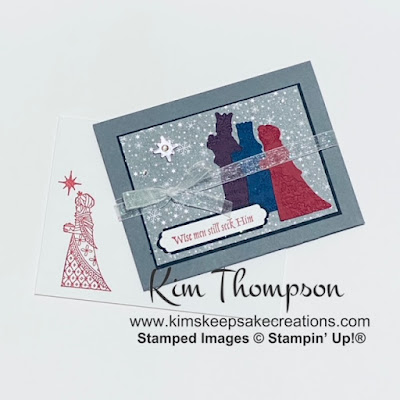
I used
the Great Tidings bundle and paired it with the Peaceful Place Specialty Designer
Series Paper for my sister’s cards. I
cut a piece of the Peaceful Place DSP and matted it onto a layer of Basic Black
cardstock. I die cut three wise men from
Blackberry Bliss, Night of Navy and Cherry Cobbler and embossed them with the Timeworn
Type embossing folder. I also die cut a
star from silver foil paper and placed a Basic Rhinestone Gem in the center of
this start and a couple gems on the Peaceful Place DSP layer. My “Wise men still seek Him” sentiment was
stamped on a piece of Basic White and punched with the Lovely Labels
Pick-A-Punch and then layered onto a punched Basic Black label.
On the
inside of my card, I added a Basic White layer for my inside sentiment. I also adhered an embossed wise man die cut
to the pop up and a piece of DSP for a background.
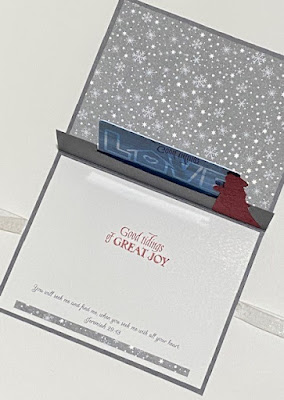
A 20” piece
of White Glittered Organdy ribbon was adhered to the back of my card. This ties in the front to hold the card
closed.
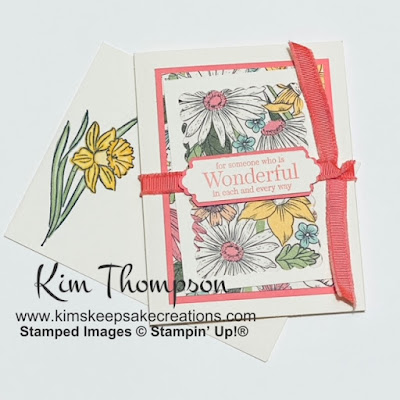
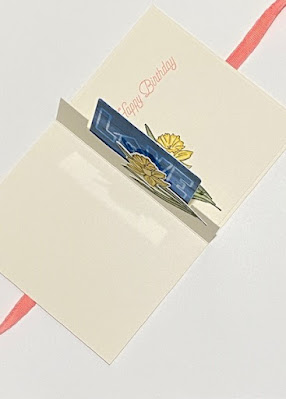
I made a
second version of this card using the new Daffodil Daydream bundle and the Daffodil
Afternoon DSP (a free with $50 Sale-A-Bration item) to make a Birthday pop up
gift card holder. I die cut a frame using the Scalloped contours
dies to frame the beautiful new Daffodil Afternoon DSP (really love this free DSP!) and colored Petal Pink Frayed Grosgrain ribbon with Flirty Flamingo Stampin' Blends to match my choice of cardstock and ink for this version. I also used Daffodil Delight, Mossy Meadow and Old Olive Stampin' Blends to color my daffodils on the inside of the card and the coordinating envelope.
Hope is also
something wise men and daffodils have in common. At Christmas we celebrate the joy the wise men
felt when they saw the star (Matthew 2:10) that led them to find Jesus, the
fulfillment of God’s promise of a Savior.
Daffodils symbolize hope and new birth and growth with the coming of
Spring, which is the season where we celebrate the Savior’s resurrection from
the dead that gives us “new birth into a living hope” (1 Peter 1:3).
Hope is
the theme of the January Encountering Joy box collection! These boxes
make a great gift for a friend or yourself as a tool for focus and reflection.
Each box includes a mini journal/album, 5 note cards and envelopes
to send out, and cards with scripture to reflect on the theme of Hope. If
you’d like more information on this monthly box kit, click here.
If you'd like to check out the products used for my project, you can click on the links below or stop by my online shop. The December 2021 host code is YNTJPFJ2.
I'd love to connect with you through my newsletter and share inspiration,
updates on what's happening with Stampin' Up! and information on any scheduled
classes. Just click here to
fill out the form to opt in to my newsletter and receive a free tutorial as
well!
Merry
Christmas to you all and thanks for hopping along with us today! Don't
forget to let me know you were here by leaving a comment and check out my
teammates' blogs by clicking on the links below.
- Peaceful Cabin Cling Stamp Set (English) [156395] $23.00
- Peaceful Place 12" X 12" (30.5 X 30.5 Cm) Specialty Designer Series Paper [156394] $15.00
- Basic Black 8-1/2" X 11" Cardstock [121045] $8.75
- Basic Gray 8-1/2" X 11" Cardstock [121044] $8.75
- Basic White 8 1/2" X 11" Cardstock [159276] $9.75
- Blackberry Bliss 8-1/2" X 11" Cardstock [133675] $8.75
- Cherry Cobbler 8-1/2" X 11" Cardstock [119685] $8.75
- Night Of Navy 8-1/2" X 11" Cardstock [100867] $8.75
- Silver Foil 12" X 12" (30.5 X 30.5 Cm) Specialty Pack [156457] $10.00
- Cherry Cobbler Classic Stampin' Pad [147083] $7.50
- Stitched Rectangles Dies [151820] $35.00
- Lovely Labels Pick A Punch [152883] $23.00
- Paper Snips [103579] $10.00
- Stampin' Cut & Emboss Machine [149653] $120.00
- Rhinestone Basic Jewels [144220] $5.00
- White 3/8'' (1 Cm) Glittered Organdy Ribbon [156408] $8.50
- Tear & Tape Adhesive [138995] $7.00
- Stampin' Seal [152813] $8.00
- Stampin' Dimensionals [104430] $4.00
- Mini Stampin' Dimensionals [144108] $4.00
- Daffodil Daydream Bundle [157795]
- Daffodil Afternoon 12"x12" Designer Series Paper [158127]
- Flirty Flamingo 8-1/2" X 11" Cardstock [141416] $8.75
- Very Vanilla 8-1/2" X 11" Cardstock [101650] $9.75
- Flirty Flamingo Classic Stampin' Pad [147052] $7.50
- Scalloped Contours Dies [155560] $35.00
- Blushing Bride 3/8'' (1 Cm) Frayed Grosgrain Ribbon [156341] $8.00
- Daffodil Delight Stampin' Blends Combo Pack [154883] $9.00
- Flirty Flamingo Stampin' Blends Combo Pack [154884] $9.00
- Mossy Meadow Stampin' Blends Combo Pack [154890] $9.00
- Old Olive Stampin' Blends Combo Pack [154892] $9.00


")
 Specialty Designer Series Paper")


 Open Weave Ribbon")


")


 Faux Suede Trim")


